Let’s work together on a children book

Bonjour!

We are today going to talk about a new projet I have started. Do you remember on my article about my goals for 2020? I wanted to talk more about my work as a freelance illustrator. Turns out I am currently working on a client project. I think it is perfect to share with you my experience.

It is a children book that will be done in watercolors.

Let's work together on a children book
A selection of book I worked on and that I need to show you!

I am happy to say my author on this project agreed to participate in this blogging adventure. She is letting me share some insight on the creation of the book and also how we work together on this new children book.

During this series of blog posts I will show you the steps of creation of a children book.

I will show you how to illustrate a children’s book. I plan to present you the the steps I take. But I am also planning on sharing how I take care of the project management. This mean how I organize myself to finish a project on time. How I involve the author in the realization of the book. After all the author is the starting point of the book and at the beginning at least, knows his project way better than I do. Maybe if you too are doing a big project like this too, we can exchange and see were we can help each other.

A self published book.

Let's work together on a children book

A lot of the project I do are for clients that want to self published the book they wrote. It means that the process might be a little different than the work process with an editor. The first difference being that the person I answer to is the author and the author only. It allows for a very personal collaboration. I really love this kind of closeness to the author. I believe it helps get their vision closer to what they have imagined when writing the story. With an editor, aside from the author himself that is sometimes not involved, there is editors and art directors that will be here to help you and influence the project.

What book project are we going to create together?

Sleep tiny dreamer by Shanita Allen and illustration by Isabelle Arne

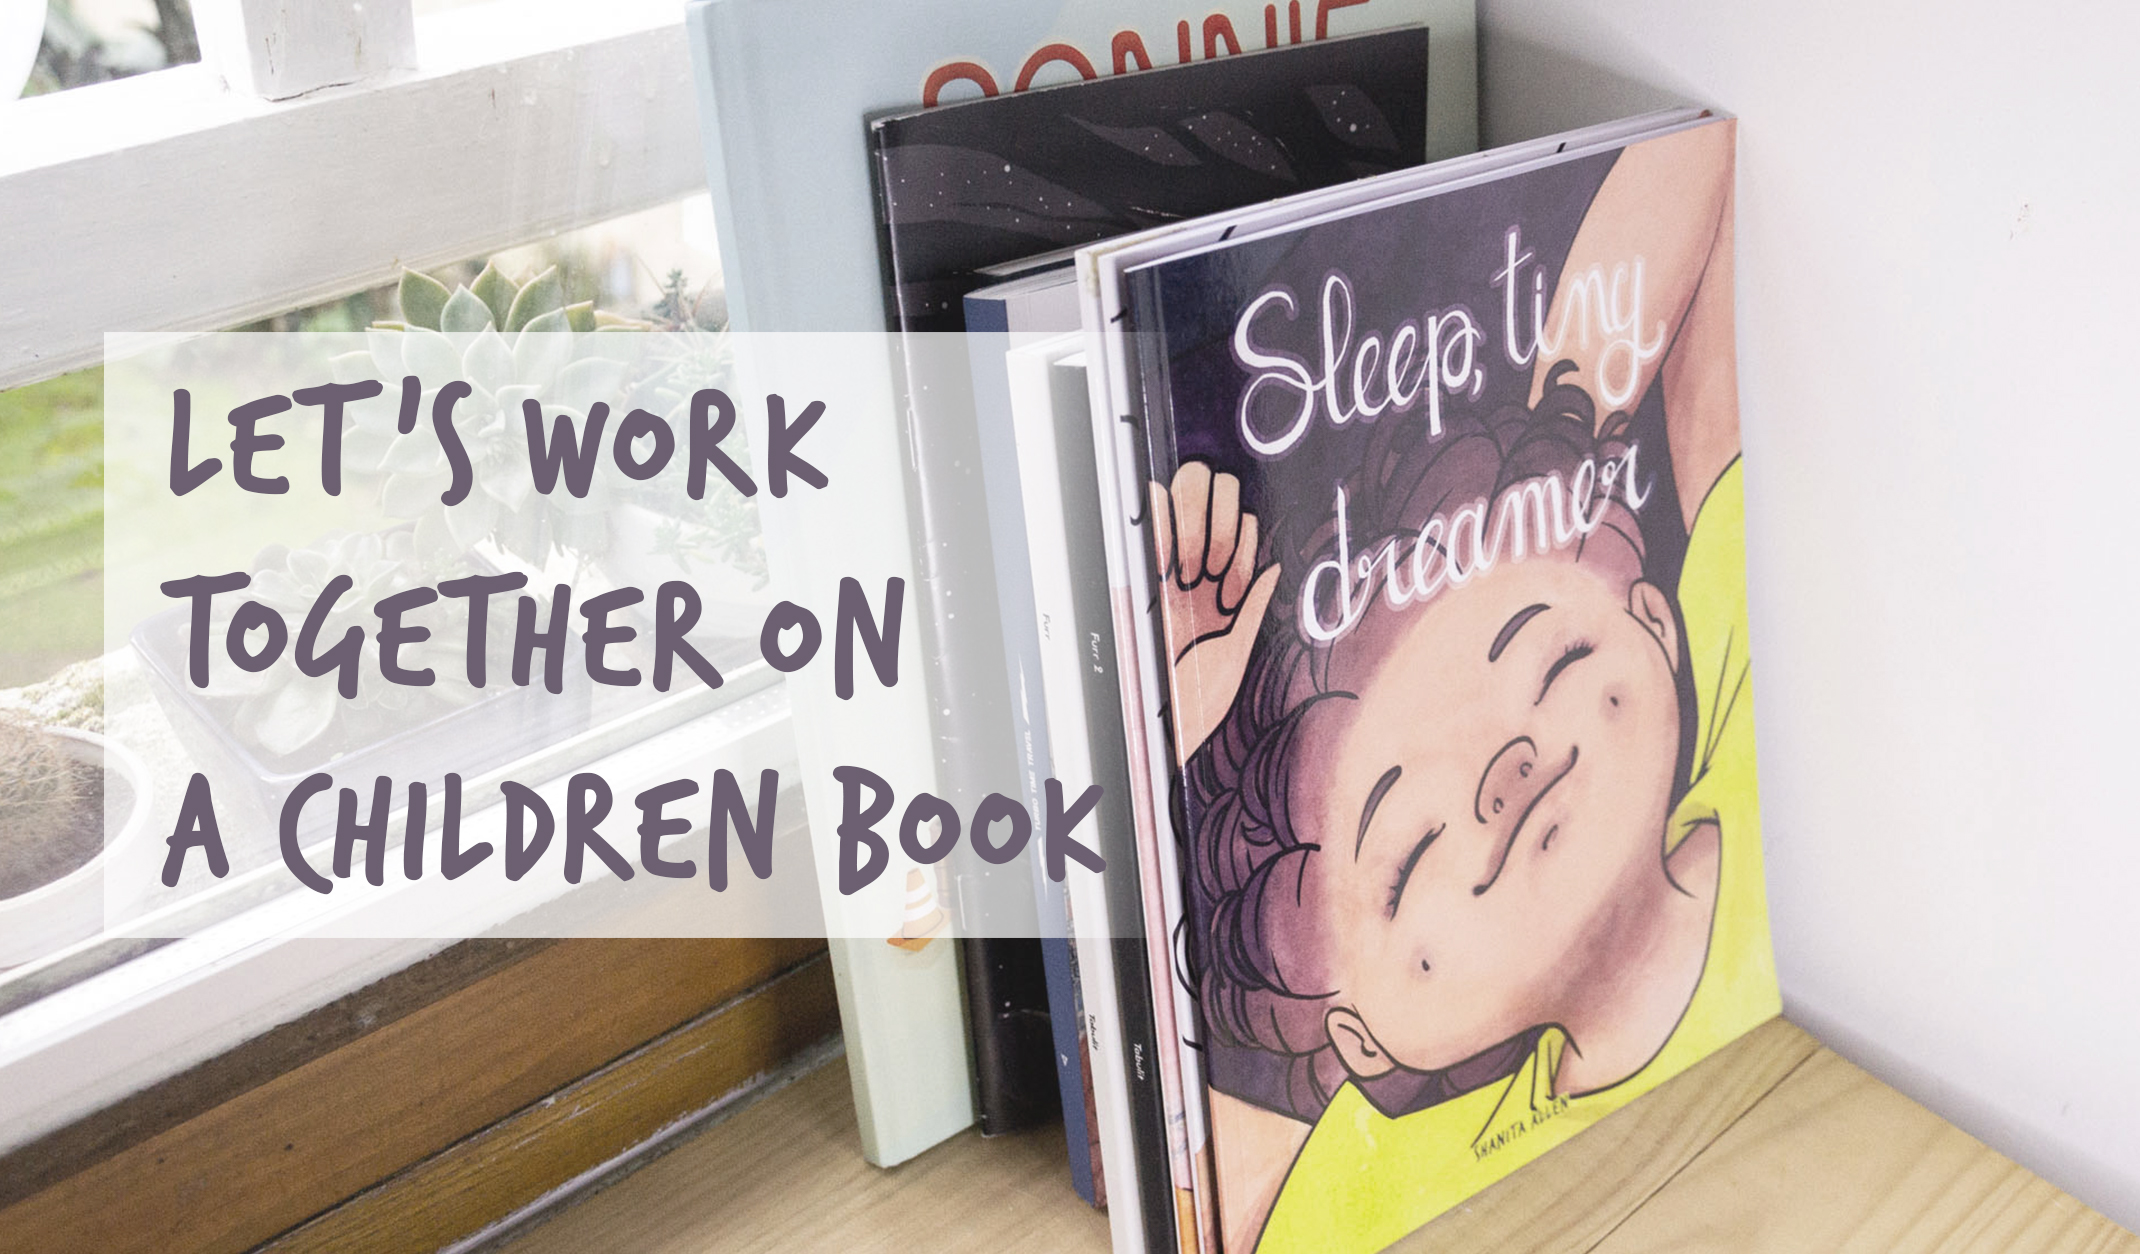
The book we are going to create together is the following story of a book that is already out: Sleep tiny dreamer by Shanita Allen. Shanita came up to me a little bit more than a year ago. She contacted me through on Reedsy an online platform that links authors to illustrators. She had the dream of being a child book author. Her wish came true and now she’s ready to publish the second one and continue her dream. The story follows the same hero Ari and is in the same series.

A presentation of the previous book will be in a separate article. I will show pictures and talk about this first book.

I’ll be of course happy to share with you dear readers. If you have questions about the project I will be glad to answer.

Let’s work together on a children book ! Children book 101 :

I will list all the articles related to this project in this post so you can find them easily:

I hope you are excited as I am about this project. Have a good week and see you next Saturday!

In the meantime did you see my redraw of an old painting on instagram?

Creating a panel of comic : Radiant

Bonjour!

As you may or may not know my comic Radiant has been out for a few weeks already. If you ever missed it you can read it in english on Webtoon and Tapastic

Et pour vous Français ici même.

On the side of the publication I also wanted to show you how the creation of the comic was going. I have quite and advance on the pages that are being published, and these days I am working on coloring page 16. I won’t show you any of it yet since it would be a major spoil on the story but I can shop you a few steps of pages that have already been published. This way you will see how I go creating a panel of a comic page.

If you haven’t read it I’ll highly advise you to go read right now so there will be no surprise and spoils!

Behind the scenes: creating a panel of the comic Radiant

1/ The sketch

Creating a panel of comic : Radiant page 01
Sketch from page 01 of Radiant

There is steps before getting such a sketch of the panel but I’m really sad to say even I have difficulties understanding those. I’ll be sure to show this step in more detail another time but it can be pretty abstract. In this sketch I try to have the anatomy, the features of the characters and the expression settled. It’s the last sketch before the inking. And even if there isn’t all the details I want to to be rather precise.

2/ Inking a panel

Creating a panel of comic : Radiant inking

To ink a panel of comic, especially with Radiant I like to use some kind of calligraphy brush. It roughly looks like ” / ” this (a tilted line). For the 15 first pages of the comic I did everything with Adobe Photoshop but on the last page I moved to Clip studio paint. My process is exactly the same and the change of software has not much impacted on my workflow. Inking tends to rigidify a lively sketch but with time the inking will become more and more natural.

3/ Blocking color zones.

Just before moving to coloring a panel of comic, I like to “block my color zones”. It means that I will decide on what will go with what. I don’t do much zones actually. I like to separate the character from the background and on very rare occasion the background will be separated in 2 zones but I rarely go over that. Because 1 zone makes one layer, I’d rather have less layers and lighter files. In pPhotoshop especially if you use a lot of layers the software can lag and you don’t want to paint with a laggy computer. It’s honestly the worst. Clip studio paint almost never lags but I’ve kept the habit of making very few layers in my comic files.

Keep it light!

4/ Coloring a comic panel

The final colored version of a panel of Radiant

When I decided what style to paint or Radiant I decided to go for a mix of efficiency and aesthetic. Since this is a comic and I had in mind a regular schedule or publication, I need to be able to paint a comic page every two weeks or every weeks. This is why I opted for this flat style with shadows made with the lasso tool.

The lasso tool allows for a quick turnaround when painting but also gives that very satisfying edge that I like. Radiant had kind of a soft look and to make the overall mood soft, I like to color my line with a corresponding color to the colors of the page.

Thank you I hope you liked creating a panel of my comic Radiant with me !

Don’t forget to go read it here on Webtoon and here on Tapastic I’d love to know if you liked the story and art!

Happy 2020! Goals for the year.

Bonjour et bonne année! Like we say in France!

I hope your year will be joyous and plentiful. I have of course set a lot of goals to myself, but nothing too drastic, rather and goals like “no more sweets” I’m going to try to be gentle to myself and honestly I’d rather set myself artistic goals. It is the only goals I know I will truely follow.

Some of these goals for 2020 won’t surprise you.

I plan on talking more about my comic Radiant, and finishing the series this year. And I have also projects for this blog like talking more about what I do as a freelance illustrator, talk more about my current projects. Also show you some finished work and tutorials on how I do things.

I don’t know if you would be interested but if I can help 1 person it would definitely makes me happy.

isabelle arne illustration goals 2020

I also want to work on a watercolor series that has been going on loosely for the past years. The garden people series. It is illustrations about people and plants, their relationship with them, how to take care of them and the overall love of plants and nature.

It is a subject I love very much as a succulent addict myself and a nature lover.

I recently finished this one :

isabelle arne illustration cactus plantation cactii planting

Did you set yourself artistic goals this year? What do want to achieve?

Don’t forget to be extra gentle with yourself.

?

Starting out on doing conventions

Bonjour !

How are you? I’ve been wanting to do conventions or a while now and I am starting out on doing conventions now. And I was able to have a table in a small convention the weekend before. In this article I want to talk a bit about my experience and how it went.

Setting up a table for a convention.

If you have read my previous article, you know that I have spend a good amount of time getting some goodies, prints and artworks ready for the event. A week before the event Mefisheye and I decided to do a test of our table to see how it could look like. Did I tell you ? Mefisheye and I were sharing a table. Sharing a table is a good idea to try out conventions, it allows to share the expenses for the location of the table but also to travel to the event and accommodation.

starting out on tabling at a convention
Our test table

So we tried setting out a table as what we expected to have during the convention. It is a very personal choice, but for our own table we decided to go for wooden boxes to give a bit of volume and a blue cloth. Honestly most of our choices was because we had those elements lying around at home. Since we had already invested quite a lot of money in the prints and goodies, we wanted to be more cheap on the displays.

The event

mefisheye setting the table for a convention
Setting the table at the convention

The day before the event we went to set our table on the actual location of the convention. And the next day we finished up and made the table as pretty as we could.

What do you think? Was it nice enough?

tabling at a convention
This is me getting ready to the opening.

Two people is better than one.

The odds were not really in our favor. There was a nation wide strike and a lot of people stayed at home that weekend. The convention went through Saturday and Sunday and we met very very few people. I was even more happy we were two to behind the stand because we could chat and while one was on guard the other one could go have a look at the rest of the convention.

Meeting new people and connect with other artists.

I was also very happy to meet with our tabling neighbors. Very nice people with more experience than us on doing conventions. It is something I had a very nice memory from my old days and it has not changed since, conventions is really a good way to meet new people and extend your connections. There is the artists tabling around you but also the public, some people are artists too and often the one that get closer to your booth are artists themselves or art enthusiasts. It is very great and you are sure to have a topic of discussion at hand!

The aftermath

It’s all fun and games, but you might be wondering did I actually made money? Yes and no?

Yes I did sell enough to cover the cost of the table and some more but no it wasn’t what I had expected. Knowing the convention was far from big centers and cities, I did not expect to make big money but I hoped I could get a decent payment for the work made during the weekend. What we did was honorable but not worth the trouble. I’ll put everything on the size of the event and the big strikes going on but I’ll admit we were a bit disappointed.

It won’t stop me from trying again and do more conventions

me, today

I very much loved the event and the overall mood of it all. I loved that we were able to meet so much people and my inside introvert find the setting quite appropriate. You can go see my video for a more “vivid look” into the convention and how it went:

I hope we can do some more events and If I do I will surely talk to you about it!

Have a nice end of 2019 because I’m not sure I’ll have time for a new article by the end of the year.

Lots of love <3

Getting ready for a first convention

Bonjour !

I hope you are good this is the last days of November and I’m really itching to decorate the tree. But before that I have a big event next week and I must get ready for my first convention in almost 10 years!

The venue is a medium small convention in a small town an our away from where I live and I will be sharing the booth with Mefisheye. The convention will be over the weekend and we are allowed to come the Friday afternoon to install the stand. And it’s time to get ready for this convention!

Preparing products!

Since we will be tabling, we do have to have products to sell during the convention. This venue only allow products under 20€ to be sold for the kind of stand we picked. It means that we will have to prepare cheap art products like :

  • Prints
  • Stickers
  • Handmade sketchbooks
  • Linocut prints
  • Enamel pins
  • Original artworks

I had a few more ideas but since I’m still not 100% sure of what will come out of this (I’m talking about some print on fabric experiments that I am not sure will come out great).

Preparing prints

This require first illustrations, that I did during Inktober for the most part. And I had planned on printing them at home, since I have a very nice Canon printer that does a really nice quality of print. I had a few difficulties with the paper I picked because it turned out the quality paper I had chosen gave print of very bad quality. I just changed it, it’s ok, it can happen.

When creating products you are expected a few loss.

Harry potter hermione print for convention
Harry Potter A6 prints made for the convention

Printing and cutting stickers.

Stickers are my little pleasure, I love to stick them on my sketchbooks. So if I can share the love I will!

For these ones as well I used my printer on vinyl paper. The hard part was the cutting as it is all homemade but it is part of these little repetitive tasks that makes creating products so satisfying.

For the designs, in my Etsy shop I already have 2 types of designs available so I didn’t have to create much for the convention. I just created one new design with a geek theme since the convention organisation explicitly asked to have geek themed artworks to sell. And you know me I don’t have many of those…

Getting ready for a first convention

Making handmade sketchbook

Creating little sketchbooks to sell is kind of an experiment but also kind of a little pleasure as well for me? I love sketchbooks and I love making it myself, picking the paper, designing the cover and I actually already made a bit of experimentation a while ago. So I just made a few to test the market.

How I handcrafted the sketchbooks

Getting linocut prints ready for the convention

Linocut prints is also kind of an experiments, firstly because my linocut prints are very non geek related and maybe it won’t fit with the public there. But also because as with every item here I am trying to find out if there is a market for it in this kind of convention. Creating these was very easy since I had all my linocut prints already!

When I did my travel series two years ago I actually never went to the point of selling any print. So let’s see how it goes.

getting ready for a first convention
The forest linocut print

Packaging enamel pin for the convention

The Kickstarter is now ended, and as I told you in my post about the Kickstarter success, I received my first design of enamel pins. After sending the polls to my backers to know what pins they would like I still have a few pins that I can sell.

Some are for my etsy shop customers because I know the pins has had a lot of success there. I just want to packaged it differently for it to be more attractive to event shoppers. I will package the enamel pin in opaque tissue paper for the backers but for people window shopping like on a convention, I thought it would be nicer to put the enamel pins in clear bags.

It fit quite well that I have leftover compostable clear bags from my sticker packaging. So that’ how it turned out:

cute cat mask enamel pin for convention
Enamel pin packaged

Selling original artworks at a convention

This one I’m kinda torn, as I told you the maximum price allowed for me is 20€ and there isn’t many original that fit in that price range. I managed to do tiny watercolors that fit that price. I will be selling the original art that I made into stickers.

To have the original artworks ready for the convention, I bought some frames in a local garage sale. It’s a lot cheaper than brand new frames and often there is new or close to new frames. So it’s a really good way to make everyone happy.

It’s really nice to see these little watercolor framed.

Tiny Pokemon watercolor art

Presenting your products on the table.

Now that you have all your products, you have to present everything on a table. This I will have to do a test before the big day. I am planning on doing it this weekend so there isn’t much I can say about it now, but I’ll be sure to talk about it when I can with some pictures as well!

During this convention I want to test the market, see how my artworks are received and what kind of products has the most success. I can understand that testing the market and starting convention is hard. Especially because you don’t know what will sell and it is one of the reason why I have prepared such a wide range of products.

I will be very glad to share my experience with you in the future and in another article!

The convention is the BGF Winter and I will be there (pour toi français qui ne lit certainement pas cet article!) :

Thank you so much for reading this long post!

Creating Enamel pins: Kickstarter success!

Bonjour!

Did you know? The Kickstarter to create my enamel pins was a real success! I was funded and the pins are now coming to life. I want now to take you with me into the creation process of an hard enamel pin.

Getting your idea for the pin.

This is I guess the first step to think about, what to make as a pin? For my case I can’t really remember how the cat mask idea came about. I think it was a mix of the japanese mask stickers set I had just made and also the fact cats are just adorable.

I first sketched my ideas but also started talking about it around me.

I think at that time I wasn’t really sure I wanted to do a Kickstarter but when you do a product you have to talk about it and I like sharing the process. Like I am doing now!

cat mask enamel pin creation

Creating the enamel pins design for manufacturing.

Manufacturing a design into pins require various constraints. You have to create a vector file, decide on the colors, mind the gap between each lines to allow the enamel to be poured.

Deciding ont he colors was the easy part. Once the design picked I just cleaned it up and added some colors to have an idea of how it could look like. I even did a few propositions and asked my followers what colors they liked best.

Once the design is sure and settled I put the design in to vectors. I used Adobe Illustrator to do so as it is the software I am the most confortable with. Manufacturer only take vectors files as it is easier for them to cut the design into parts to create the product.

I also need to say that I knew nothing on enamel pins but the internet being the awesome place it is, I found a lot of advice and guidelines on how to make enamel pins. A special thank you to The pink samurai and Pin Lord both offer very clear and simple help to create your own enamel pins.

creating enamel pins

There ressources helped me get my file ready to send to the manufacturer. At that time I had already started my Kickstarter. But since pin production took a lot of time and I had enough fund for 1 pin I send it to production ahead of time. I was also curious of how the production would go and if the pin would turn out great.

Finding a good pins manufacturer.

Finding a manufacturer was easy, there is so much manufacturer on Alibaba and when you start talking about enamel pins on Instagram or Kickstarter they just send you direct messages to propose their services. But I was not confident to trust the creation of my enamel pins to some random manufacturer.

It was my first pin after all. You want some trust!

Luckily there is a place to find a good manufacturer (didn’t I told you the internet was a great place?) There is a Facebook group of pin creators that give advice and helps each other with all the manufacturing issues and success. I found a well graded manufacturer there and started the collaboration.

The production of enamel pins.

Honestly there isn’t much you can do at this step aside from waiting for the updates, or asking for updates on the production. For my pins it took around a month shipping included. In the end it was quite fast.

In the meantime the Kickstarter got funded, I got to celebrate a little and a few days later here they were:

creating cat mask pins

I am very glad about the result, they are all of very good quality and so far I haven’t seen any defect in any of them. It could happen sometimes but I guess I got lucky and picked a good manufacturer?

Enjoy!

creating cute cat mask enamel pin

I dearly enjoyed creating enamel pins. I love having my design coming to life in a physical form. How better than creating a collectible!

Now that the Kickstarter is funded I will go on and ask for the production of the second design. And I’m quite sure I’m not going to stop here! So let’s see go creating new enamel pins designs!

I hope you enjoyed this little experience, there is still a few pins left on my Etsy shop. You can pre-order it from here. You can also check out more details from my video here:

See you soon!

25 hours of comic challenge : 12 pages in a day!

Bonjour! I love to do challenges, It pushes you and prouves that you can do it. You are able to do things fast, and above all, have fun.

This challenge is all about fun and not much seriousness.

The official poster of the event

The goal of the 25 hours of comic challenge is so hard to complete that no one really try to have the best art in the comic or the best story but just to have a comic made in the end.

The challenge is organised by the same crazy french people that does the 23 hours of comic challenge. An even crazier challenge since you have to do 24 pages in 23 hours. You can find the official website of the 25 hours of comic challenge here. I’ve already taken part in the 23h of comic twice so I was really excited to do this one as well. Check out my comics for the 23H of comic in my short comic series here.

The event of the challenge took place the 26th and the 27th of October.

Being really tired already by Inktober and the overall change of season, I decided this time to have a partner to do the challenge. This way the work shall be divided in two and it should be easier.

My partner in crime for this challenge was Mefisheye.

25 hour of comic challenge bordeaux
The Team in Bordeaux

For the event we joined a few artist and comic enthusiasts from Bordeaux.

The challenge starting the Saturday 1pm to the Sunday 1pm we had to be in a space that could take us in all night. And a nice café let us use a room for the night.

The collaboration went great with Mefisheye, it was our first time doing such a project together and we had great fun. The story we made is absolutely nuts but we love it.

25 hour of comic challenge mefisheye
Mefisheye working on the storyboard

We started slowly on writing the story and the storyboard.

The story came out of a joke and in the end it’s what we choose. The story is about a duck called Godwin that can travel through time and wants to destroy all of Hitler’s ancestors.

After the storyboard we split the work for the sketching of the page. To keep a consistant look we decided that the person that was doing the sketch of a page would be doing ink of the other’s person sketch.

25 hour of comic challenge isabelle arne
Me inking one of Mefisheye’s sketch

Since we were two we only had to sketch 7 or 8 pages each, which means that around 8 pm we were ready to do the cleaning/inking step. We picked the dip pen and indian ink to clean the sketches. We used a light table to help us transfer the drawings.

Actually we really felt like the challenge was too easy in some way.

Maybe it was because we were used to such a dreadful challenge as 24 pages in 23 hours. But we kinda made a mistake here as well. We were supposed to add colors with watercolor above that inked line. But we discovered the ink we used wasn’t waterproof. Such sadness.

25 hour of comic challenge uploading pages

We had to give up on that dream and in fact it really shortened our work. We uploaded the comic to the 25 hours of comic website, got our medal, and went home.

Well it’s ok, I was quite tired so I was happy to go home… at 4am … it’s still night and not the day after…

You can now read the result here or read it here in french.

  • 25 hour of comic mefisheye isabelle arne
  • 25 hour of comic mefisheye isabelle arne
  • 25 hour of comic mefisheye isabelle arne
  • 25 hour of comic mefisheye isabelle arne
  • 25 hour of comic mefisheye isabelle arne
  • 25 hour of comic mefisheye isabelle arne
  • 25 hour of comic mefisheye isabelle arne
  • 25 hour of comic mefisheye isabelle arne
  • 25 hour of comic godwin
  • 25 hour of comic godwin
  • 25 hour of comic godwin
  • 25 heures BD godwin
  • 25 heures BD godwin
  • 25 heures BD godwin
  • 25 heures BD godwin

I hope you enjoyed this little challenge and the crazy result that we got. So much things could have been better. But it’s the difficulty of that challenge.

Tell me what you think of the comic in the comments, and would you be ready for such a challenge?

Making a comic for webtoon, where to start ?

Bonjour! As stated in my previous post, since Inkotber is coming to an end, I am going to talk more about my other projects. And the main project right now is my comic Radiant. I want to take you with me on I prepared and I am making a comic for Webtoon and digital formats.

What is Webtoon?

making a comic for webtoon the start
Webtoon’s front page on desktop

You might have heard me talking about it already. Webtoon is an online platform that allows you to post and share you comic for free. You can check out my short comics here and my old comic Day Dream that are already available to read there. There is other platforms like that and another one I use is Tapastic. It is quite the same as Webtoon except Webtoon is Korean and Tapastic is American. But ont the way they work it’s basically the same.

The comics are posted as episodes, and are usually made for vertical scrolling. This way it is very easy to read on tablets and phones. I read mostly from Webtoon on my phone and I must say this format is very very confortable.

Mockup psd created by rawpixel.com – www.freepik.com

How to start a comic?

What a difficult question! And it will actually be really hard to answer. So I will only talk about my experience and the one I have with Radiant.

Radiant has been in the making for a very long time. The early writings of it are from 2011, but I think I really started writing it it around 2014~2015. Writing is my first step, I like to take my time in writing the story and scenario.

Finding the comic’s story.

The base of Radiant was a collection of dreams I had made around 2011 (do you write your dreams? because I do it’s an amazing source of inspiration!). I arranged two or three dreams to make a full story. Then I first started by making a list of events and writing the beginning and the ending. I like to write the ending very early on so I can know where to go.

concept art  radiant
Concept art from a dream that shaped the story of Radiant

The rest is a mix of developing the story and knowing my characters. Knowing your characters better helps to know how they would react to such situations. Scenes are depending on the character reactions. This development part takes the most time and some event from the list can change place or just be deleted. It really depends on what you want.

For Radiant I did get spend a lot of time in writing. I feel like this preparation even before doing the comic is essential. I did drew a few sketches while writing because I already had an idea of what the characters looked like. The proper character design was not made until the story was almost done.

RAdiant story early sketch
Early sketches of Radiant and the characters

Finding the characters

Since Radiant story originated from dreams. I had a very good idea of what the character looked like, since I had already seen them. And I didn’t spend much time on designing them. Also I had a wish for Radiant to have this simple, clean look. It is something I also tried to think about while creating the landscape, buildings and even the overall style and color.

I have recently done again the character sheets for the comic. Since there is a 2 years gap between the original pages and the new one I am working on these days. I feel like it is quite important to have such kind of character sheet so you can know exactly how the character look. You can go back to it often and be sure that you are drawing the character correctly.

Ophelia character sheet

To resume how to start a comic for Webtoon:

  • Find your story.
  • Write the main plot point.
  • Develop your story.
  • Create your character.
  • Create your universe style.

I will talk another time about creating an actual comic page and the steps of creation. For now it should already be food for thoughts.

I hope you enjoyed this little insight and that you are ready for more comic content. This weekend is the 25 hour of comic challenge! And I of course will be doing that. I’ll talk about it in a future article if I survive the challenge.

Have the best weekend ever! (or at least a decent cosy one)

Plans for the future and projects

Bonjour ! I think now that Inktober is well on it’s way, it’s time to think about what I will plan for the future and projects after that.

It’s a very personal subject that I guess everyone needs to answer to sometimes. I’m inviting you right now to see my video on the subject, I talk while showing you the process of three of the Inktober illustrations featured at the end of the article.

What do you want to do next ?

I have in fact decided on what to do a while ago, but It is time to tell talk about it to you!

You may already have a hint if you’ve come to this blog, I am obviously talking about Radiant. If you don’t know, Radiant is a comic I started around two years ago. I published it on various free comic platform like Webtoon and Tapas. I had to stop because I didn’t have enough time with my client projects.

watercolor illustration Radiant plans for future
watercolor illustration of a character of Radiant

In the meantime I started to publish Day Dream, an old comic of mine and Carole Ballereau. An episode is out every Sunday on Webtoon and Tapas, and the series will still be going for a while as there is much episodes !

So my close plans for the future and projects are all about Radiant. That comic I am writing and illustrating by myself. And since it’s so personal, it’s very close to my heart and I am very excited to share it again on the wide web! The first time it came out the public had a very good response to it so I’m super glad to publish it again.

I am currently working on new pages and I’m very motivated to finish it whatever happens !

I hope you will follow me in this endeavor! For now you can read the first pages by checking out the yellow boxes all around this article (in case you missed it!).

You can also read more pages on my Patreon for 2$. I post 2 pages a month until the official release the 4th of December. I will also post it in French here on the website.

I wish to talk about this project much and bring you along with me on the journey.

Radiant character sheet future projects
Character sheet of one of the characters of Radiant

Yes what other plans or the future?

Tons, always tons of projects! A reason why I want Radiant to be out there, is also because I want to have other comics out. I have stories pilling up, and I need to get these out into the world. I will talk more and more about comic in this blog. But I will also talk about product creation. Since I love real things, in the sense of, I love digital medias but I love above all actual real things like books or enamel pins !

product making future plans
Watercolor sketcbook created for my etsy

You know I’ve started my Kickstarter project for enamel pins. It’s really part of the wish I have to create real tangible things I can hold in my hands. I believe I’ve already talked about it in my article about the Kickstarter but pins are collectible works of art and I love that about it. I with to talk about all these kind of creation in the future. And of course I will talk about how I created these pins in more details in the future.

Do you have plans for the future like this ? Answer in the comments !

I’d love to see what you have in your mind! will you follow my adventures?

And to finish let me show you the inktobers so far :

Enamel pin creation: Soon on Kickstarter !

Bonjour ! As stated in the title, I’m about to create my first enamel pins and launch it on Kickstarter !

EDIT (14th of November 2019) : The kickstarter was a success I will do posts about the pins creation in the future!

enamel pin cat mask kickstarter

Enamel pins are collectible work of art. Pin’s are making a come back in the best way possible. It’s a new way of displaying beautiful art on a nice object, and it’s also a fashion statement. I’ve always enjoyed seeing them done by other but I’ve decided to try and make my own. The initial cost being a little expensive, I’ve decided to fund the first pins through Kickstarter.

The campaign start in two days but in the meantime you can go have a look :

Here on Kickstarter to see the pin’s !

If you don’t know the principle of Kickstarter it’s very simple. You choose pledge and rewards, for exemple the “2 pin’s” set and you pay for your buy. Kickstarter keeps the money, if the campaign is successful you are charged, and the money is sent to me to produce the goods, package, and ship it to you.

If the campaign fails, and I really hope it won’t to see these pretty pins come true, so if it fails, the money is send back to you fully.

It’s quite safe for both parties and it’s why I like it.

kickstarter print cat mask

The Kickstarter will have a few added rewards like prints and stickers and also extended goals for special enamel pins.

Some pledge are quite exclusive and in very limited number.

You can right now asked to be notified of the beginning of the kickstarter on this link here.

So if like me you are quite excited by the creation of these enamel pins ! Go on Kickstarter, the Kickstarter starts the 15th of October until the 14th of November ! Don’t miss it (but I’m sure I will talk about it more in future posts, maybe you could be interested in enamel pin creation process ?)